Monday, November 30, 2009

Dare to DIY Blog Party with the NewlyWoodwards: Dare to . . . Eat Cookies!

I am all over Kim's DIY challenge for the week. See me already posting on Monday morning? Am I good, or what? (Okay, I'll admit it, the picture is actually from last Christmas. I haven't really baked my Christmas cookies yet. A girl can pretend, right?)

These Soft and Spicy Gingerbread Cookies are as delicious as they are pretty. They do involve rolling, cutting, and decorating, but they really aren't all that complicated. I found this recipe on the blog "Good Things Catered." (Be sure to check out that blog for lots of yummy ideas.)


Soft and Spicy Gingerbread Cookies (Pictured on far left.)
Ingredients:
-1 c. butter
-1 c. sugar
-1 c. molasses
-1 egg
-4 c. flour
-1 t. salt
-1 1/2 t. baking powder
-1/2 t. baking soda
-1 t. cinnamon
-2 t. ground cloves
-2 t. ground ginger
-1 t. ground nutmeg

Directions:
1. Cream butter and sugar in mixer.
2. Add molasses and egg.
3. Combine remaining ingredients. Add to mixer. Mix until smooth.
4. Cover and chill for at least one hour.
5. Preheat oven to 350. Line baking sheets with parchment.
6. Roll out the dough to 1/4 inch thickness on lightly floured surface.
7. Cut with cookie cutter. (I used a star. Katie used a snowflake. You can use whatever you want!!)
8. Place two inches apart on prepared sheets.
9. Bake for ten minutes until firm.
10. Let cool for 10 minutes on pan and then remove to wire rack.
11. Frost when cool. I mixed powdered sugar and milk until I got my desired consistency. I placed the cookies on waxed paper and drizzled the frosting over the cookies. Before the frosting hardened, I sprinkled it with large crystal sugar.

Tuesday, November 24, 2009

Dare to DIY Blog Party with the NewlyWoodwards: Dare to Entertain

I was so going to participate in Kim's blog party again. This week she asked us to show our holiday table. Even though we aren't going to be here for Thanksgiving, I thought I could put together a cute little table. It so didn't happen. My to-do list is long these days and it just didn't make the cut. (You know the saying "Your eyes are bigger than your stomach"? Well, my ideas are bigger than my time these days. I keep getting all of these "great ideas." Too many to fit into my days.) Oh well. I thought that I would treat you all to a taste of reality instead. This is the current state of our table.

Do you like it? Here is how I accomplished this look:


1. Leave the table cloth on after having company for Sunday lunch.
2. Add a 6 month old. This will help with the high chair pieces, toys and the bunched up table cloth. (She has learned that if she pulls on it, things magically come her way.)
3. Drop the day's mail on the table in the corner once you bring it in.
4. Add in a Skype call to family while preparing dinner to finish off the look with the computer and webcam.

Viola! As easy as that!
Thought that I would keep it real for you today. Life may be a bowl of cherrys, but that bowl can be very messy at times!

Friday, November 20, 2009

Foodie Friday: Asian Pork Chops

These were delicious, tender, easy. I can't wait to eat the leftovers. (And I can't wait to try them on the charcoal grill once grilling weather returns.)


Ingredients:
-soy sauce
-olive oil
-garlic
-lemon juice
-ginger
-honey
-pork chops

Directions:
Mix all ingredients except pork chops in bowl. (I didn't bother measuring, so I don't think that you should either.) Place pork chops in large zip top bag and pore over marinade. Grill on both sides for about 5 minutes or until the chops are done.

Thursday, November 19, 2009

Give Thanks Giveaway

This morning I put all of the entries for the give thanks garlands into a hat. (Well, it was actually a Tupperware container, but you get the idea.) I randomly selected two names. Drum roll, please . . .

Sarah F (from Facebook) And yes, this is my sister. And yes, it really was random.


Kim (from the Newly Woodwards) And yes, this is who is hosting the DIY blog party. And yes, it really was random.


Thanks to the rest of you who added your comments. I am thinking that I will have to do another giveaway someday. What do you think?

Tuesday, November 17, 2009

C-Y-O: Baby Leg Warmers

I love how Little Peachy looks in leg warmers. WAY TOO CUTE!! The little bit of chunky thigh sticking out of the top and the bare piggies on the bottom. Love, love, love. I had purchased this pair at Target earlier this season.


(You didn't think I would just post a picture of the leg warmers, did you? I had to have my model show them off!)

Recently I stumbled across an online tutorial on how to make your own using women's socks. I couldn't wait to try it. I picked up a three pack of dress socks in the women's department for $5. (This makes for quite the savings as most baby leg warmers are well over $5 for one pair.)
I had Peachy wear them in her 6 month pictures with a onesie I decorated for her.

(She wouldn't crack out the full face smile while we were at the portrait studio, but as soon as we got home she was flashing the gums all over.)

Since I didn't take pictures as I was sewing them (I was in a hurry to get them done in time for the pictures.) Here is the link to the tutorial I used.
Now I am on the lookout for inexpensive, but cute socks to convert into baby leg warmers. (In fact, I just picked up six pairs of socks for $5 that match some of the other onesies I decorated!!) Oh no, I sense a new sewing addiction in the making.

Sunday, November 15, 2009

Dare to DIY Blog Party with the NewlyWoodwards: Dare to be Thankful

When someone double dog dares me to be creative, I have a hard time turning it down. So, the Dare to Do it Yourself Blog Party with the Woodwards was a challenge that I gladly accepted. The first week's theme is Dare to be Thankful! It didn't take me long to come up with an idea. (I needed something to replace the Halloween decor on our kitchen table anyway.) Here is what I came up with:


Give Thanks Clay Pot Centerpiece/Garland


1) Print the words GIVE and THANKS onto fall colored cardstock. (I also printed the size of circle I was going to be punching in a very light grey so that I could line up my punch more easily later.) Punch each letter with a circle punch. Then punch some patterned paper with a circle scallop punch.


2) Use double stick tape to attach the letters to the scallops. (I also punched some scallops out of the plain paper and some circles out of the patterned paper to make spacers.)


3) If you are going to be making the centerpiece, attach sticks to the back of the scallops. (I again used double stick tape and then put a scallop on top of the stick, making a sandwich. I used some bamboo skewers that we had in the kitchen.)
If you are going to make the garland, punch a set of slotted holes int he tops of each scallop. (I made a template to punch through so that I got the holes in the same places on each.)


4) If making the centerpiece, place a chunk of foam in the bottom of the clay pot. Cover the foam with something. (I used some shredded paper that I had on hand. You could use raffia, moss, or whatever else you have available.) Insert the sticks into the foam. (I need to play with my arrangement yet so that letters aren't covering each other up. I plan on doing this when I get it up onto the table.)
If making the garland, weave a length of ribbon through the holes punched in the tops of the scallops. Leave extra ribbon on each end to make bows.


And now for a surprise!! I will be giving away the two garlands that I made. Simply leave a comment on my blog or on Facebook for a chance to win. I will be randomly selecting two entries on Thursday, November 19th. (Be sure to leave your comment before then!! And be sure to leave a way for me to contact you if you win.)


Friday, November 13, 2009

Foodie Friday: Multi-Cooking

This week I am going to a Mom's Night Out. We are doing an appetizer recipe exchange/taste testing/contest. I am looking forward to it as I could live off of appetizers alone. I decided that I would make Buffalo Chicken Dip. In order to get a bit ahead, I decided to chop the celery and carrots earlier in the week along with cooking and cutting the chicken. As I was chopping the veggie sticks, I also was making our supper of Tuscan Soup. Since I was already slicing, dicing and stirring, I added a pot of chicken noodle soup to the stove. Now I have two full containers of chicken soup in the freezer ready and waiting.
Here is what I did for the chicken soup:
I boiled two chicken breasts in water with salt and pepper until they were fully cooked. Once they were done, I removed them from the water and cut them into bite sized pieces. I then returned them to the water along with diced celery, carrots, and onion. I let this all simmer for about 30 minutes. After letting it cool, I poured it into two containers and put them in the freezer. (I didn't add the noodles yet. Cooking, freezing, and reheating noodles tends to make a mooshy mess. Instead I will add the noodles before eating.)
Sorry that I didn't get any pictures. Making three dishes at once and caring for a 6 month old doesn't always allow for Kodak moments.

Thursday, November 12, 2009

A Sweet Escape


Little Peachy and I were recently able to take a little road trip. Just the two of us. My shoulder got a bit sore from reaching back in the car to find and insert her pacifier and there were a few stretches of road where her crying drowned out the road noise, but all in all it went pretty well. We were able to get together with my dear sister-in-law and her three kids at our in-laws' house. Each of us made the trip sans husbands. This might seem a bit unusual to you. Why would we go to our in-laws' without our spouses. In our family, it is not unusual at all. I am blessed with a wonderful relationship with my husband's parents and enjoy visiting with them. All of the old in-law jokes are lost on us. We were also able to stop in and see my parents. (I think they would disown me if their granddaughter were only two hours away and they didn't get to see her. :o)

Wednesday, November 11, 2009

A Peachy Little Slideshow

I enjoy putting slideshows together. (Must be the nerd in me.) There is just something that I really love about pictures set to music. I decided that I would make a slideshow for Little Peachy's half year. Hope that you enjoy!

Tuesday, November 10, 2009

6 Months Old!!!


I know that every parent out there says this, but here I am joining in. "Where did my little baby go?" I was repacking some clothes this weekend and found her newborn stuff. Wow! It really is hard to remember when she was that little. It is equally hard to believe that she has been in our lives (where we can touch and see her) for half a year!!
Little Peachy is becoming more and more active everyday. Getting her to sit nicely in church has become quite the struggle. (She just wants to talk to Pastor during the sermon, play with the hymnal (aka eat it), and sing during the prayers.) She is able to sit nicely on her own. (That is until she sees a toy that she wants and makes a mad grab for it forgetting that she is balancing. I figure she is learning all about gravity.) She LOVES her solid food. She sits there in her highchair like a baby birdie with her mouth open waiting for the next bite. She also has caught on to drinking with a sippy cup. (This is really good when she stays home with her dad and decides not to take the bottle.)
I really find her amusing. She can be a little crazy woman at times. She especially likes to get wild and woolly right before bed on her changing table. Her arms start going and then her legs start going and then the shouting begins. M said that she is trying to show us that she isn't tired and doesn't need to go to bed.
She really is the light of our lives. And I really can't imagine our family without her.

Monday, November 9, 2009

My Big Debut

The MOMS Club that I am a member of hosted a Holiday Showcase and Rummage sale this weekend. Members were able to bring their rummage to be sold as well as items that they sell. There was a Pampered Chef Booth, a Tastefully Simple Booth, a Shakely Booth, and various handcrafted items. I had grand plans of what I could all make and sell. But I learned that you need quadruple the time to get projects done once you have a little one to care for. I was able to get a few items together for the sale. I was out the door by 7:45 a.m. Saturday. (M was able to stay home and care for Peachy. Believe it or not, this was the longest time that I spent away from her. I was glad that I could leave her in her father's capable hands.) When I returned home around 2:30, I had lighter bins and some extra cash. For the first time selling my wares, I was pretty happy.

I decorated 20 onsies. 10 were for boys with ties and suspenders and 10 were for girls with flowers and birds. (Sorry that I can't get the birds to fly straight.)


I had some small ($7) and some large taggie blankets ($12) on hand. (I also had some burp clothes in my gift bin that I sold for $2/piece.)


I also whipped up some crayon rolls. (They were finished at 11 p.m. Friday night with the help of M.) They sold for $5/piece.

If you are interested in purchasing any of the items that I have left over, please leave a comment with your email address and we can work out the details.

Sunday, November 8, 2009

Scrumptious Sunday: Pumpkin Roll


Sorry this post is late. (Do you like the title, though? I do!) I hosted stamp club this month and knew that I wanted to bring something with a taste of fall. I saw this recipe on a can of Libby's Pumpkin Puree. It sounded yummy to me (and it was!!)
(I have to admit that the picture above is from the Libby's website and not my pumpkin roll. It did turn out looking pretty good, though.)

Ingredients:
Cake:
-1/4 c powdered sugar
-3/4 c flour
-1/2 t baking powder
-1/2 t baking soda
-1/2 t cinnamon
-1/2 t ground clove
-1/4 t salt
-3 eggs
-1 c granulated sugar
-2/3 c pumpkin puree
-1 c walnuts, chopped (I didn't add the walnuts. I am not nuts about nuts.)
Filling:
-1 pkg. (8 oz) cream cheese, at room temp
-1 c powdered sugar
-6 T butter, softened
-1 t vanilla
-powdered sugar (for decoration)

Directions:
For Cake:
Preheat oven to 375. Grease 15x10 inch jelly-roll pan; line with wax paper. Grease and flour paper. Sprinkle a thin cotton kitchen towel with powdered sugar.
Combine flour, baking powder, baking soda, cinnamon, cloves, and salt in small bowl. Beat eggs and granulated sugar in large mixer bowl until thick. Beat in pumpkin. Stir in flour mixture. Spread evenly into prepared pan. (Sprinkle with nuts if you must.)
Bake for 13 to 15 minutes (until top of cake springs back when touched.) (If using a dark colored pan, begin checking at 11 minutes.) Immoderately loosen and turn cake onto prepared towel. Carefully peel off paper. Roll up cake and towel together, starting with narrow end. Cool on wire rack.

For Filling:
Beat cream cheese, 1 c powdered sugar, butter and vanilla in small mixer bowl until smooth. Carefully unroll cake. Spread cream cheese mixture over cake. Reroll cake. Wrap in plastic wrap and refrigerate at least one hour. Sprinkle with powdered sugar before serving.

Wednesday, November 4, 2009

C-Y-O: Fall Votive Holders


Do you blog surf? When I am in a lazy mood, I do. I start with some of the regular blogs I read and go to other blogs they link. It is amazing all of the great blogs out there. The only problem once I get there, is I often forget how I got there and then I have a hard time getting there again. I know that I got this idea from a blog somewhere out there. If you know what blog that is, please let me know. That way I can give credit where credit is due.

Once again, I used my Dollar Spot finds to create these fall votive holders. I had a difficult time finding candle holders to decorate, so I used a set of glasses instead. I then hot glued my Dollar Spot leaves onto the glasses and added some twigs. To finish it off I criss-crossed the entire thing with raffia. (The original idea had twine, but I didn't have any, so I used raffia instead.) I was able to make several sets with the glasses that I bought. I made one to send to my sister in Japan for a birthday gift. I kept one set for myself and shared the other two with my mother0in-law and sister-in-law.

Tuesday, November 3, 2009

C-Y-O: Halloween Costume

Did you see Little Peachy's Halloween costume? I think that she is cute enough in it that I can post it again.

(Don't be alarmed by the disembodied lady bug below. I just figured you might want a closer look at all of the pieces.)


Remember my Dollar Spot finds? I used the two pair of black tights in the costume. One pair was worn the traditional way, on the legs. The other pair donated its legs for the cause. I purchased a long-sleeved red t-shirt which I then removed the sleeves. (Doesn't seem to make much sense, but stick with me here.) I took the extra pair of tights and cut the legs off following the original sleeve lines. I then surged the tight legs onto the shirt as new sleeves. (I wish that I had taken pictures as I went, but I didn't. You will just have to try to imagine it in your head.) I made a hat out of black fleece. The hat pattern had two extensions on the top that I tied into knots for antennae. I used the fleece scraps to make dots for the shirt. (I used Heat and Bond Lite and then straight stitched around each dot.) The costume could have been complete at this point, but I found this pattern on Etsy and knew that the shoes would really finish it off.


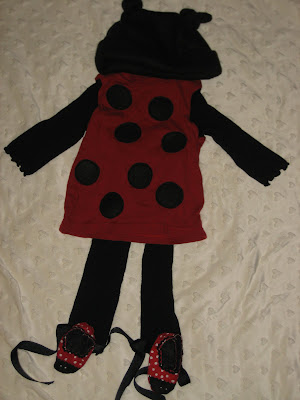
(I may now have a minor obsession with sewing baby shoes because of that pattern.) I only wish that I could dress Peachy in the costume more, but I am not sure what people would think of a Little Lady bug parading around town.