Wednesday, March 31, 2010

T-Shirt Refashion

Yes, I am jumping on the refashion blogwagon. I have a few shirts that I purchased on the Target clearance racks that were not ready wear. Not for me anyway. But I decided that I could make them work for me and picked them up anyway.
Today I'll share the easiest one. I don't think that it can really be called a refashion, more like an alteration. Here is one of the shirts pre-sewing machine.
A cute shirt, just a little too boxy for me.
See, here it is compared to one of my favorite fitting shirts.
Using my favorite short as a guide, I marked where I would need to take the new shirt in.
A few minutes with my serger and I have a new shirt with a great fit. See how happy it makes me?
Well, the shirt does make me happy, but so do my cutey new shoes!

Photobucket

Tuesday, March 30, 2010

Large Wall Art

The upstairs to our home is an open floor plan. We had the option of doing a closed floor plan, but I really love the openness of our open plan. I love that when I am in the kitchen I can see what Peachy is doing in the living room. I love the the sunlight from our mostly southern facing windows floods the entire upstairs with natural daylight. I love that when we have people over we don't feel closed in. However, there is one thing that I didn't think about when we chose the open floor plan. I didn't think about decorating. I guess I just figured that I would figure it out. In some ways I have. I have learned how to arrange our furniture without having walls to anchor it all. And a while ago I decided it was high time I tackle the large open wall in our living room. (By a while ago I mean around the time Peachy was born. Yes, she is almost 11 months old. I haven't shared this project with you yet because I really am not finished with it. Maybe I will finish it before her birthday. Maybe.)

I believe in decorating your house with real, live photographs. I love being able to see my family and friends as I go about my day. That is just the way I am. So, when we ditched our living room shelves upon moving in, I didn't know where my photographs would go. Finally, I decided to incorporate them into the large wall piece I knew I needed in our living room.

I started with a mix-match of frames that I had collected throughout the last decade. I spray painted them a dark brown. (When you are spray painting, make sure to thoroughly cover the surrounding area. I inadvertently got spray paint onto the driveway. M was less than thrilled.)
Next I cut strips of gross grain ribbon, also dark brown. I then sewed loops in the top of the ribbon. (I am a fan of sewing things. I can sew. I have the machine set up. It is easy for me to sew. If you can't sew, I am sure that you could use a hot glue gun or something else to create your loops.)

After filling the frames, I played around with their arrangement on the ribbon. Once I had an arrangement that I liked, I got out my staple gun and attached the frames to the ribbon.

We mounted curtain rod brackets on the wall and after sliding the loops onto the rod, we hung the rod on the brackets. 

(Here is the part that I need to work on some more. The ribbon tends to pull funny with the weight of the frames. I want to make the ribbon strips again, but this time hang two tails from the ribbon loop. That way I will have an inverted V formation to hang the frames from which I am hoping will help them hang a little straighter. I'll be sure to let you know when I get that done!!)

Monday, March 29, 2010

Baby Cakes Tutorial

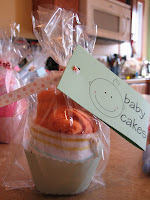
In my spare time I love to surf the web. This surfing often leads to a long list of projects that I find and NEED to do in the rest of my spare time. I recently stumbled across these adorable baby  accessory cupcakes. They happen to have all of the criteria for the perfect baby shower gift.
1) They are cute. (The momma needs cute)
2) They are unique. (The momma doesn't want ten of the exact same gift.)
3) They are practical. (While the momma wants cute and unique, she doesn't want something that she is just going to trip over for the next year until she decides to sell it on Craigslist.)


While I knew I could probably figure out how to make these without a pattern, I don't like to reinvent the wheel. If someone has already gone to the trouble of figuring it out, why not allow them to lead the way. You know what? I couldn't find a single pattern or tutorial out there. So, I took it upon myself to figure it out. Now I am posting a tutorial to help lead the way for all of you. (After trying to take pictures and figure out how to describe my technique, I may know why no one else has attempted to make this tutorial in the past. But I decided to give it a shot anyway.)

Supplies for One Baby Cake:
- Onesie (0-3 month)
-Infant washcloth                                          
-One pair of infant socks            
-Two straight pins
-One cupcake liner/wrapper
-One cellophane treat bag
-One clear rubber band
-8 inches of coordinating ribbon

Directions:
1. Stack socks with one slightly higher than the other.
    Starting from the toe end, roll socks.


2. Fold Onesie into thirds. (Sleeves should just overlap and the leg openings should be just past the fold.)

Fold up the snap bottom toward the sleeves. 

Fold one sleeve over the top of the other sleeve. (You should be left with a relatively uniform width from the top to the bottom.)

Place the rolled socks toward the bottom of the Onesie and tightly roll the Onesie and socks from top to bottom. (You may have to do some slight tucking and adjusting along the way.)

3. Fold the washcloth into thirds.


Place Onesie/sock roll onto the washcloth and roll it up in the washcloth. Leave about a half inch of the washcloth below the Onesie.


Insert a pin under the top layer of washcloth through the roll to hold together.
Fold the corners of the washcloth over on the bottom so that they all meet in the middle. Poke a pin through all of the layers.


4. Place cupcake roll into a cupcake liner or wrapper. (I used the template from Skip to my Lou and traced it onto scrapbook paper that I already had.)
5. Place the cupcake into a cellophane treat bag. (I had mine on hand, but I think that I purchased them from Michaels.)
6. Secure the top of the bag with a clear hair rubber band.
7. Tie your ribbon over the rubber band.
8. I also made these tags. Pink for the girl Baby Cakes, Blue for the boy Baby Cakes, and green for the either/or Baby Cakes. (You can print your own copy by going here.)


Friday, March 26, 2010

Foodie Friday: Baby Food

I was going to be one of those moms. One of those moms who uses cloth diapers that she made herself. One of those moms that serves her baby only homemade baby food. You know, one of those moms. Then Peachy happened. We did start off with homemade cloth diapers. They didn't work for her. (To be honest, I am kind of happy. I don't know if I would want to be washing her solid foods dirty diapers anyway.) I did make pureed vegetables for her when she started solids, but then I was at a loss as to what to do next and resorted to Gerber 2nd and 3rd stages.
I recently checked this the Blender Baby Food book from our library hoping for some inspiration in escaping the baby food jar. This book offers parents ideas, recipes, and menu plans all organized by child's age. And the recipes go way beyond pureed vegetables. (Like they sounded really good to me!!) I started with the Cheesy Broccoli and Ham Pasta recipe.

Ingredients:
-1/2 c pastini
-1 c broccoli floretes
-1/2 c diced cooked ham
-1/2 c herb flavored cream cheese

Directions:
1. Add pastini and broccoli to saucepan of boiling water; cook until tender, about 10 minutes. Drain, reserving 1/4 cup of the cooking liquid. Stir in ham, cream cheese and reserved cooking liquid until well combined.
2. Transfer to blender and blend to desired consistency.

Sounds yummy, right? Well, Peachy doesn't like it. She is not a picky eater, but would rather eat the Gerber jarred food or finger food rather than anything I grind or blend for her.


See how happy she is devouring an avocado and quesadilla for lunch the other day? Silly girl! I'll let you know if I end up making any of the other recipes from the book and how they go over.

Thursday, March 25, 2010

Excuse Slip

Hi All! I am still here. I am just super busy with other things in life lately and haven't been able to blog as much. When I do sit down at the computer I find that I don't have the proper pictures to blog about and read other blogs instead. I assure you that I will be back  to writing more regular blogs soon.
I have been working up a storm in the craft area. I can't wait to show you what I have been working on. (I can tell you it is not cleaning the house. :o)
I also caused a minor flood in our home this week. Ooops. Lets just say that when the sewer shut-off valve is on doing a load of laundry is not a good idea.
Hope that you are all enjoying the arrival of spring where you are!

Tuesday, March 23, 2010

Who Needs Toys?

You know the adage about a child playing more with the box the toy came in than the actual toy? Too true. Peachy is always ten times more entertained with objects that are not intended to be toys. So why do we buy them anyway? I am quite positive it is to entertain the adults!

Forget Grandpa and these toys. Give me the rug!!

Plastic is always lots of fun!

Toys with tags and wrapping paper are the best!!

Clothes are fun and always available.

Things that moms and dads use always seem very intriguing.

A good read is hard to resist.

Can you tell she knows she is not supposed to have this? Can you guess what it is?

Monday, March 22, 2010

Dance, Dance, Little Peachy

Peachy has always enjoyed music. Now when she hears it she even dances. I think that soon The Peachy will be showing up in all the clubs.

Friday, March 19, 2010

Foodie Friday: Ooey, Gooey, Chewy Chicken

Doesn't the name suit this picture? While it may not win Miss Photogenic, it will win over your taste buds. This chicken is GOOD! That's right, with a capitol G, O, O, and D.

Ingredients:
-Chicken breasts
-BBQ sauce
-Onions, sliced
-Bacon
-Shredded cheddar and jack cheese

Directions:
Douse chicken breasts with BBQ sauce. Bake, covered, at 375. Once top side is no longer pink, flip them over. Douse with sauce again. Once that side is no longer pink, cover each breast with onions and bacon. Continue baking, covered until chicken is done. (I cooked mine for about 2 hours. They were very thick breasts that were frozen solid when I put them in. Just use your meat thermometer and make sure you get an internal temp reads 160 or higher.) Turn the temp up to 400 and remove foil in order to crisp the bacon. Once bacon is crisp, turn off the stove and cover each breast with cheese. Put the pan back in the warm oven until cheese is melted.

Wednesday, March 17, 2010

Fun O the Irish

I am proud to say that mingled in with my German heritage I do have a smigion of Scotch-Irish in me. And what a better day to celebrate those few drops of blood than St Patty's Day? (Well, actually the weekend before St Patty's Day.)
This weekend I lured my little sister to our home with the promise of attending the local St Patty's Day events. While we didn't make it to the parade, we did catch some music and dancing.


 And what would a St Patty's Day celebration be without a little plaid kilt and some Irish ghillie tights


While I do believe Peachy thoroughly enjoyed her get-up, I also think that next year she would appreciate some fancier duds. (See how she is eying up the dancers' bling?)


Our Saint Patty's Day fare does not consist of everyday food colored green, no way. Instead we enjoy corned beef, cabbage, and Guinness. You know, the kind of food that'll put hair on ye chest.


Don't worry, we didn't fill Peachy's sippy with Guinness.


Even though she does a pretty good drunken Irishman.