


Monday, December 24, 2012
Merry Christmas 2012
I am taking the week off to celebrate the birth of our Savior King. May you all be blessed with a wonderful Christmas surrounded by those you love. We will see you in 2013!!

Friday, December 21, 2012
Foodie Friday: Cranberry Cream Cheese Dip
 |
| image source: Jamie Cooks It Up |
Jump on over to Jamie Cooks It Up for the recipe!
Thursday, December 20, 2012
Christmas Tour 2012
I promised you a while back for the complete tour of our home with its Christmas decorations. I finally got a sunny day to snap some shots. (Yes, while many other states are dealing with rain and snow today, we got sun. I am a happy lady. I know that we will get plenty of snow. I am okay with putting it off a little while longer.)
 You have seen the entryway decor and can read about it here.
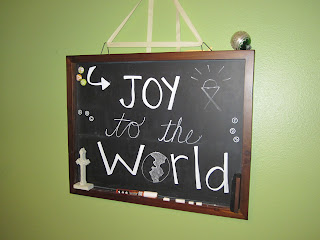
 And you can read about my table off-center piece and chalkboard here.
 Here is our tree. We seem to relocate it every year. This year it is more out in the open. I like that because we can use the entire tree. It is a small tree and we have many ornaments. It is always such fun getting the ornaments out of the box and remembering where they are all from.
 Here is a new addition this year. I knew I wanted to do something with my window. I ended up going with a fabric garland and simple wreath. I really like how it turned out.
 I made this Christmas banner last year. It hangs on our hutch with the snowflake ornaments on each side.


 At the top of the stairs we have a little table that has my favorite Christmas decorations on it. I have been saving vintage glass ball ornaments for a while and now have enough to fill a small hurricane jar. (With a fun little vintage elf thrown in.) My mom bought me these pine cone elves last year at a great little store in my hometown. I love their character and whimsy! And then there is this fun little deer as well. Peachy also really likes this area as she is constantly rearranging the elves and trees.
 This is our third year of hanging our stockings and Christmas cards on the curtain rod where the picture frames usually hang. (You can see how it normally looks here.)
 I got these fun glass ornaments on Christmas clearance one year. I vary how I use them from year to year, but this year they are all nestled in a bowl with a birdie friend.
 The girls have several toy nativity scenes. I couldn't resist adding this picture in of their FisherPrice set. Love that there is an unknown gentleman talking on his phone in front of the manger. Wouldn't that be the case if Jesus were born today?


Tuesday, December 18, 2012
Away in a Manger

I have been involved in more Christmas services than I can count. I was a participant every year from kindergarten through the end of college in either a children's service or sacred concert and then I was a director until I had Peachy and "retired" from teaching. Even without my child participating the impact of all of those young voices uniting in the familiar Christmas story and those often sung Christmas hymns and songs has always touched my heart. And this year it was a double whammy. There was my child, grown up enough to be up front with the other kids, adding her voice to Away in a Manger and Go Tell It on the Mountain. And then there was the recent shooting in Connecticut also weighing heavily on my heart.
What a wonderful privilege to see my little one expressing the faith that is in her heart and allowing us all to take time and focus on the true reason we celebrate Christmas, that little Lord Jesus in the manger bed.
Thursday, December 13, 2012
What Peachy AND Cream Wore This Week: Winter Accessories
Winter is now completely upon us here in the northern portion of the country. We have a nice ground cover of snow and the temps have all dipped well below the freezing mark. Peachy is having a hard time figuring out why the snow just isn't melting on the sunny days we have been having. But what the girl can figure out is how to rock the winter accessories.
Here she is modeling her new winter boots for us all to admire.


Here she is modeling her new winter boots for us all to admire.

You heard it here first, people, layering your princess dresses with your winter snow boots is going to be the latest trend. (At least among those under 4 years of age.)

Isn't this a fierce pose? I am telling you, this girl has modeling down. Watch out LA, Peachy is coming to town.
However, Peachy isn't the only one who is able to pull off the winter gear this year. She had better watch out because Cream is all about accessorizing as well. Check out how well she pulls of the stocking hat.


It appears Cream is leaning toward the gangster look in her approach to the cold and fashion. One last look at a complete ensemble by Cream.

The snotty nose and cheesy grin all add an air of candidness to the snowsuit look, wouldn't you say? Now go out there, stay warm, and look good doing it!
Tuesday, December 11, 2012
Chocolate-Mint Pinwheels

I made the executive decision to scale back the cookie making this year. In other years I have happily added to the sugar overload at our Christmas celebrations. I decided to leave the Christmas baking to those who are more gifted with it and only do what I felt like doing. This week I decided to make my first, and perhaps my only, batch of cookies this month. I didn't go with one of my previous standards, but tried something new. It was nice to bake without a deadline and just for fun.

Chocolate-Mint Pinwheels
from The Better Homes and Gardens New Cookbook 15th Ed.
Ingredients
-1 c butter, softened
-1 c granulated sugar
-1 t baking powder
-1/4 t salt
-1 egg
-1 t vanilla
-2 1/4 c all-purpose flour
-2 oz semisweet chocolate, melted and slightly cooled
-1 (4.67 oz package) layered chocolate-mint candies, finely chopped (1 cup)
-1/4 t peppermint extract
Directions
1. In a large mixing bowl beat the butter with an electric mixer on medium to high speed for 30 seconds. Add granulated sugar, baking powder, and salt. Beat until mixture is combined, scraping sides of the bowl. Beat in egg and vanilla until well combined. Beat in as much flour as you can with the mixer. Stir in any remaining flour.
2. Divide dough in half. Stir melted chocolate into one dough portion. Stir chopped mint candies and peppermint extract into remaining dough portion. Dived each dough portion in half. Cover dough and chill for at least 1 hour until easy to handle.
3. Roll each peppermint dough portion into a 9 1/2 by 6-inch rectangle on wax paper. Roll each chocolate dough portion into a 9 1/2 by 6-inch rectangle on wax paper. Invert one chocolate dough rectangle on top of one peppermint dough rectangle; remove top layer of waxed paper. Roll up dough. Pinch dough edges to seal; wrap in plastic wrap. Repeat with remaining chocolate and peppermint dough rectangles. Chill dough rolls for 1 to 2 hours or until very firm.
4. Preheat oven to 375 degrees F. Lightly grease cookie sheets; set aside. Unwrap dough rolls; reshape, if necessary. Cut dough rolls crosswise into 1/4-inch-thick slices. Place slices 2 inches apart on prepared cookie sheets.
5. Bake in preheated oven for 6 to 8 minutes or until edges are firm and just starting to brown. Transfer cookies to wire racks and let cool.

Monday, December 10, 2012
Recycled Christmas Decorations
I got two more of my Christmas Pinterest to-do list. After I had blogged about my projects, some of my gracious readers (read my family members) came through for me. I was lacking the barn board and the pinecones for the first and fourth items on my decorating list.
My father came through with the board and some of the pinecones while my sister-in-law got the rest of the pinecones during a Thanksgiving Day hunt. (Thanks guys!)
Talk about a simple and easy project. (Once you have the board, that is.) I raided Mr. Cherry's workshop for five nails and after hammering them in, tied the ribbon. Easy as that.
While this one took a little more time, it was just as simple. And with these simple touches, I am loving how my entryway shelf is looking. All ready for Christmas.
I am linking up with the fabulous bloggers doing Dare to DIY: Dare to Decorate at the blogs Newly Woodwards, Decor and the Dog, Maybe Matilda, and Two Twenty One. Be sure to stop by and check out their great projects.
 |
 |
| Star Project Idea: Beyond the Picket Fence |
 |
| Painted Pinecone Project Idea: Under the Sycamore |
I am linking up with the fabulous bloggers doing Dare to DIY: Dare to Decorate at the blogs Newly Woodwards, Decor and the Dog, Maybe Matilda, and Two Twenty One. Be sure to stop by and check out their great projects.
Friday, December 7, 2012
Foodie Friday: Creamy Chicken Pockets

Here is a yummy Pinterest find that I recently made called Creamy Chicken Pockets. It is from the blog Pennies on a Platter. I have tried a few other recipes from this blog and have always been impressed. This one was a winner as well. Both the adults and the children in our house liked these pockets of chicken goodness. The only change I made to the recipe was to use the crescent dough sheet rather than the individual pre-cuts. I then cut the sheet into 8 squares for my pockets. Serve them with some mixed veggies or a salad and you have yourself a meal.

Thursday, December 6, 2012
The Christmas Cow
I have no excuse for the lack of posts this week other than Christmas business. We have been partying it up this week and now we all seem to have colds. Go figure! Here is hoping that they are gone before Christmas. (Oh, and we don't get another before then.)

Last weekend we got most of our Christmas decorations up. Peachy just loved it all. She even wore her Christmas cow costume! And helped Mr. Cherry with a dress-up outfit as well. Maybe a new Christmas tradition for our house? :o)

I will get more pictures up of the other decorations in our house once I get the mess taken care of today. When you are busy and your kiddos aren't feeling 100%, it is hard to stay on top of the clutter. I have big plans for taking it on today and winning!

Monday, December 3, 2012
Wine Gift Bags
I love to give homemade, but sometimes the Christmas season gets a bit overwhelming and completely homemade just isn't always possible. At times like this, I still like to add a small homemade twist to my gifts. Whether it be in the form of a homemade card, a small homemade addition, or something fun and homemade with the wrapping.
 I went with homemade wrapping with these bottles of wine I am giving this season. A simple muslin bag with a stamped message and some Christmas chotchkies add a homemade touch to this store bought gift.
(Just make sure to check a few things out when you are working on this project. #1. Make sure you allow extra fabric. Maybe even make a sample first. (These babies fit like a glove, I tell you. In other words, another 1/4 inch would have been much better.) #2. Always check that you are spelling the words correctly. (With two little ones running around while I worked on this project, it took Mr. Cherry's watchful eye to catch that I had forgotten the "g" in jingle. Don't worry, all fixed now.)
If you are looking for some other homemade Christmas gift ideas, you can check out my Homemade Holiday series from last year.

Homemade Holidays Week One (This is a huge list of presents I have made over the years.)
Homemade Holidays Week Two (Ruffled Tote)
Homemade Holidays Week Three (Fabric Luggage Tags)
Homemade Holidays Week Four (Coordinates Frame)
Homemade Holidays Week Five (Tea Wreath)
Homemade Holidays Week Six (ABC Cards)
I am linking up to the Dare to DIY series from the fabulous ladies atDecor and the Dog, Maybe Matilda, Newly Woodwards, and Two Twenty One.

(Just make sure to check a few things out when you are working on this project. #1. Make sure you allow extra fabric. Maybe even make a sample first. (These babies fit like a glove, I tell you. In other words, another 1/4 inch would have been much better.) #2. Always check that you are spelling the words correctly. (With two little ones running around while I worked on this project, it took Mr. Cherry's watchful eye to catch that I had forgotten the "g" in jingle. Don't worry, all fixed now.)
If you are looking for some other homemade Christmas gift ideas, you can check out my Homemade Holiday series from last year.
Homemade Holidays Week One (This is a huge list of presents I have made over the years.)
Homemade Holidays Week Two (Ruffled Tote)
Homemade Holidays Week Three (Fabric Luggage Tags)
Homemade Holidays Week Four (Coordinates Frame)
Homemade Holidays Week Five (Tea Wreath)
Homemade Holidays Week Six (ABC Cards)
I am linking up to the Dare to DIY series from the fabulous ladies atDecor and the Dog, Maybe Matilda, Newly Woodwards, and Two Twenty One.
Subscribe to:
Posts (Atom)

