Showing posts with label Create-Your-Own. Show all posts

Tuesday, February 2, 2010

Homemade Christmas Gift #5


We exchange names on M's side of the family for Christmas. This year I just happened to get my sister-in-law and best friend, Jenny. I wasn't sure exactly what I was going to get for her until she casually mentioned on a shopping trip that she would like some new baking pans. I bought her the baking pans and some other baking goods to go along with them. I also decided that Jenny needed a new apron for all of her cooking and baking. The pattern that I bought was for a retro full apron. I found the perfect fabric to make it out of at Jo-Ann Fabrics. It was a little more complicated than I anticipated, but I was able to finish it the day before we left. I am sure that Jenny will use her apron while she creates many wonderful meals and treats!

Monday, February 1, 2010

Homemade Christmas Gift #4


Potholders. I knew that I wanted to make potholders. I needed potholders to go with the cookie mix that I was giving to the members of our playgroup. I needed to make these potholders. I had several patterns. The only problem was that they involved binding. I can do binding. (I mean I do quilt and all, but it just seemed like so much work.) And then I found a tutorial for these easy, peasy and cute potholders. I would love to share the tutorial with you, but it has disappeared. I will do my best to explain how to make these on my own.


1. Cut five 8 inch squares of fabric. (I used two different fabrics. You could use one fabric, or even five.) Cut one 8 inch square
of Insul-bright.
2. Press four of the squares diagonally in half with wrong sides together, creating four triangles.
3. Place the Insul-Bright square on the bottom. Place 8 inch square right side up on the Insul-Bright.
4. Start placing the triangles on top of the fabric square. Place each triangle in a corner with raw edges on the raw edges of the square. Overlap each triangle as you go. Pin thoroughly to avoid slipping.
5. Stitch with a quarter inch seam allowance around the square.
6. Trim the corners and turn triangles over to the back of the Insul-Bright.


I gave myself permission to go Sandra Lee and do a semi-homemade gift. I made the potholders and then bought packages of cookie mix from the grocery store. This saved me some much needed time as I was still working on these the morning I brought them to playgroup.


Tuesday, January 12, 2010

Hamemade Christmas Gift #2

I found this fun and easy scarf tutorial at Make and Takes. (If you are ever looking for fun and easy craft ideas, this is the place.)


I started by cutting the fleece into five inch wide strips. I stacked three strips on top of each other and sewed down the middle. Then I took out my scissors and fringed on each side of the scarf. A little fluffing and viola!


I think that my niece and nephews approved! (These are some cute scarves for some cute kids!)


Tuesday, December 1, 2009

CYO: Baby Shoes

I never thought that I would be one of those moms. I always thought that I would be practical and ultimately level-headed. But alas, I have become what I thought I would not. I am a mom who loves to play dress-up with her baby. I have way to much fun buying and putting together fun outfits for Little Peachy. Luckily for me and our bank account, I haven't gone completely off the deep end. I try not to spend too much money on outfits that will only be worn for a few months and will most likely end up with spit-up and poop on them. This means that I have to get creative in my clothes gathering. I have had very good luck through garage sales and Craigslist. It feels good to get a pair of jeans for $1 that would have originally cost 20 times that amount. I have also been getting into crafting clothing and accessories for Peachy. My latest obsession is in the footwear department. (Those of you who know me well, are not all that surprised by this.) I have bought a few pairs of Peachy's shoes from Target, but otherwise they have all come from garage sales and most recently I have made them. It is so much fun taking a basic pattern and adapting it to look completely different.

The first pair of shoes I made were for Peachy's Halloween costume. When I found this pattern on Etsy at Precious Patterns I knew her costume would not be complete without them.

Since they had a deal of buy two patterns, get one free at the time, I couldn't resist and ordered this pattern as well.
On the next pair, I decided to use the pattern as a suggestion and create my own pair.

(And yes the flower is removable. You know, in case it doesn't match her outfit.)

I can't wait until I find the time to make some more!!

Tuesday, November 17, 2009

C-Y-O: Baby Leg Warmers

I love how Little Peachy looks in leg warmers. WAY TOO CUTE!! The little bit of chunky thigh sticking out of the top and the bare piggies on the bottom. Love, love, love. I had purchased this pair at Target earlier this season.


(You didn't think I would just post a picture of the leg warmers, did you? I had to have my model show them off!)

Recently I stumbled across an online tutorial on how to make your own using women's socks. I couldn't wait to try it. I picked up a three pack of dress socks in the women's department for $5. (This makes for quite the savings as most baby leg warmers are well over $5 for one pair.)
I had Peachy wear them in her 6 month pictures with a onesie I decorated for her.

(She wouldn't crack out the full face smile while we were at the portrait studio, but as soon as we got home she was flashing the gums all over.)

Since I didn't take pictures as I was sewing them (I was in a hurry to get them done in time for the pictures.) Here is the link to the tutorial I used.
Now I am on the lookout for inexpensive, but cute socks to convert into baby leg warmers. (In fact, I just picked up six pairs of socks for $5 that match some of the other onesies I decorated!!) Oh no, I sense a new sewing addiction in the making.

Wednesday, November 4, 2009

C-Y-O: Fall Votive Holders


Do you blog surf? When I am in a lazy mood, I do. I start with some of the regular blogs I read and go to other blogs they link. It is amazing all of the great blogs out there. The only problem once I get there, is I often forget how I got there and then I have a hard time getting there again. I know that I got this idea from a blog somewhere out there. If you know what blog that is, please let me know. That way I can give credit where credit is due.

Once again, I used my Dollar Spot finds to create these fall votive holders. I had a difficult time finding candle holders to decorate, so I used a set of glasses instead. I then hot glued my Dollar Spot leaves onto the glasses and added some twigs. To finish it off I criss-crossed the entire thing with raffia. (The original idea had twine, but I didn't have any, so I used raffia instead.) I was able to make several sets with the glasses that I bought. I made one to send to my sister in Japan for a birthday gift. I kept one set for myself and shared the other two with my mother0in-law and sister-in-law.

Tuesday, November 3, 2009

C-Y-O: Halloween Costume

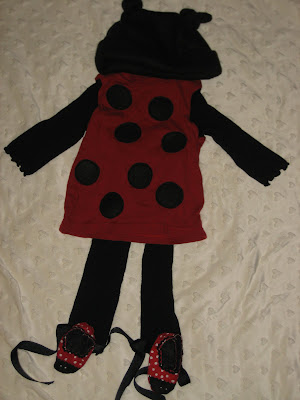
Did you see Little Peachy's Halloween costume? I think that she is cute enough in it that I can post it again.

(Don't be alarmed by the disembodied lady bug below. I just figured you might want a closer look at all of the pieces.)


Remember my Dollar Spot finds? I used the two pair of black tights in the costume. One pair was worn the traditional way, on the legs. The other pair donated its legs for the cause. I purchased a long-sleeved red t-shirt which I then removed the sleeves. (Doesn't seem to make much sense, but stick with me here.) I took the extra pair of tights and cut the legs off following the original sleeve lines. I then surged the tight legs onto the shirt as new sleeves. (I wish that I had taken pictures as I went, but I didn't. You will just have to try to imagine it in your head.) I made a hat out of black fleece. The hat pattern had two extensions on the top that I tied into knots for antennae. I used the fleece scraps to make dots for the shirt. (I used Heat and Bond Lite and then straight stitched around each dot.) The costume could have been complete at this point, but I found this pattern on Etsy and knew that the shoes would really finish it off.


(I may now have a minor obsession with sewing baby shoes because of that pattern.) I only wish that I could dress Peachy in the costume more, but I am not sure what people would think of a Little Lady bug parading around town.


Tuesday, September 22, 2009

CYO: Couture Kid Clothes


I can spend forever and a day on Etsy. (For those of you who don't know, Etsy is like a craft fair on line. Different crafters post pictures of their creations and you can buy them and have them shipped to your very own home.) I love looking at all of the creative ideas out there. I have to admit that I am more apt to steal the idea than buy it, though. A while back I found the most adorable onsies for little boys. I saved the picture to my craft file on my computer for future reference. Being that we had a little girl, I was unable to use the idea for her, but I kept the idea filed away for a future date. And that day came when one of M's friends had their little guy.
I purchased white long sleeved onsies from Target and dipped into my fabric stash to create these.

Tuesday, July 14, 2009

CYO: Father's Day Present


I know this post is a bit late, but I just found the picture I took of this project and realized I hadn't blogged about it yet. The great thing is, you can use this for much more than Father's Day.


What you'll need:
-frame (mine came with a mat, you could also purchase it separately)
-scrapbook paper
-double stick tape
-ruler
-scissors
-a picture, of course
What to do:
1. Trim paper to the size of the mat.
2. Use tape to adhere paper to mat.
3. Add picture.

This is an easy twist on a framed picture as a gift. The recipients of my project appreciated it immensely. (Then again, that may have had something to do with the subject of the picture.)

Wednesday, July 1, 2009

CYO: Mop Solution


The star of today's post: Vinegar

I am back and so is my sidekick vinegar. As promised, today's post will detail how I clean my hard floors. (So exciting, I know!)

To begin with, I have my other trusty sidekick, the Dutch Rubber Broom. This is essentially a broom with a rubber head. I also am equipped with two buckets. One is empty. The other has a solution of vinegar and warm water. (I sometimes will also add some Borax to up the ante.) I place several rags into the bucket with the vinegar. Then I wrap the broom head with one of the rags and proceed to mop the floor. Once the rag gets dirty it goes into the empty bucket and another rag is placed on the broom head. (This way you aren't repeatedly dipping a dirty rag/mop into your clean water.) When I have moped all of our floors, I simply pour out the vinegar solution and put the dirty rags into the laundry.


Vinegar's dashing co-star: Dutch Rubber Broom


The dirty rag bucket (Don't judge me for the seemingly uncleanliness of my cleaning buckets. We used them to clean paint brushes and rollers when we painted our home before moving in.)


The clean rag bucket/vinegar solution bucket

I have to admit, I did not come up with this process on my own. You will find this any many more green cleaning ideas in the book "Organic Housekeeping."


Monday, April 20, 2009

C-Y-O: Laundry Soap


First came the homemade cloth diapers, now homemade laundry soap, makes you wonder what is next, huh?

After doing some investigating, I found out that I could make my own laundry soap that would work well for washing cloth diapers that wouldn't be too harsh for the baby's skin. After seeing how easy it would be and how little it would cost, I thought, "Sign me up."

We had leftover Ivory soap at church from a soap carving project that was about to get tossed, so I grabbed it up. (I think I have 30 bars and you only use a third of a bar for each 2 gallon batch. I think that it will last me quite some time.)

A friend was getting rid of her Pampered Chef cheese grater and donated it to the cause.

I already use Borax for household cleaning, so stealing a half cup from my open box was not a big deal.

All I needed was to track down the washing soda. I checked all of the normal stores, Wal-Mart, Target, the dollar store, two grocery stores, before finding it at our old grocery store by our former apartment. I think it cost under $3.

I also purchased a two gallon bucket from the dollar section of the grocery store.

All ready to roll.


1) Grate 1/3 of a bar of Ivory. Into a large stockpot. Add 6 cups of water and heat on stove top until soap is dissolved.

2. Add 1/2 cup of washing soda.

3. Add 1/2 cup of Borax. Stir until dissolved.


4. Remove from heat. Pour 4 cups of hot water into a bucket. Add the soap mixture and stir. Add 1 gallon plus 6 cups of water and stir.

5. Store in the bucket covered. I think I will be getting a shower cap to cover mine. You may want to stir the soap before each use. (I will be using the yard stick we have in the laundry room to do the job.) Use 1/2 cup per load of clothes.

Monday, April 6, 2009

Create-Your-Own: Cloth Diapers

As promised, here is some more information about the cloth diapers that I have been sewing. I know that you have all been waiting with baited breath.

Cloth diapering our babe has been something that I have been considering since I found out that I was pregnant. Seeing that I will be a stay-at-home mom, it is feasible for us. I have my green moments here and there, but that is definitely not the driving force behind this train of thought. While it will be nice to save money on diapering, that was not the impotace either. It is just something that I wanted to try. And so, I am. Since I am not 100% committed to the idea, I didn't want to invest too much initially. I figure after we try it on for size and decide that it is for us, then we can take the plunge and buy some of the "real" cloth diapers sold out there. If you come from the old school method of cloth diapering, you should really take a look at what is available today. Gone are the days of folding a yard of fabric to keep your babe dry. Cloth diapers come in many shapes and sizes these days. It is a bit overwhelming when you first start looking into it.


For now, I am going with sewing my own cloth diapers. I started with a google search and found oodles of information on how to sew a cloth diaper, what fabric to use to sew a cloth diaper, different styles of cloth diapers, and patterns for cloth diapers. One day I was chatting with one of my preschool parents who was also expecting. Low and behold she was also planning on sewing her own cloth diapers. She brought in some of the ones she had made up and gave me some of the patterns that she had printed off the Internet. She even came to my house to help me get started after I confessed to her that I was having a hard time biting the bullet. And that is all that I needed to be off and running. Here is the stash that I have created so far.


Most of these are made with the Wee Weka pattern. A few are from another source that I will not name here as I paid for what I thought was going to be a book and turned out to be some pdf pages. Not so happy about that one. And some are Rita's Rump Covers. (Gotta love the names out there.)

Here is a close up of the diaper all folded as it would be on a baby. (Sorry, no cute baby to model it yet.)


Here it is opened.


These are called pocket diapers (or nappies if you are from the UK, which must have lots of cloth diaperers because many sites refer to them as nappies.) That means that there is a pocket that you insert a liner or soaker into. The liners have created so far are just cheap wash cloths folded over three times and stitched together.


I plan on making some more out of the flannel scraps that I have left over from the diapers.


These are not covered diapers or all-in-ones, so I had to figure out what I was going to use for the covers. Some site recommend a fabric called PLU (I can't remember what this is short for, but in essence it is a water-proof fabric.) However, this fabric is not cheap and not sold in regular fabric stores. Fleece and wool are also recommended, but they would simply be water resistant, not water proof. So, I ended up ordering good, old fashioned diaper covers like our moms used. I found some new ones on Ebay for a reasonable price. (I ordered too many, actually, so if you are in need of some 0-3 month diaper covers, let me know.)


When we registered this weekend we registered for a stainless steel garbage can with a foot operated lid to be our diaper pail. I need to find or make a wet bag to go inside. Then when I am ready to wash the diapers, I will just take the wet bag out and into the wash with it all.


I didn't make any newborn sized diapers. I figure that they are only that size for a little bit of time and it wouldn't be worth it to sew enough diapers for each day to make it worth the time and effort. So in the beginning we will use disposables, but once we start with the cloth I will let you know how it is going.

Wednesday, March 11, 2009

CYO: Taggie Blanket

A taggie blanket and a travel pack of baby products is my go-to baby present. I like this present because I think that it is practical, easy to make, unique, homemade, and fun.

Quite often I will make up a batch of these at a time. They are ultra handy to have around when the need arises. Plus, they are one of those projects that are almost just as easy to make a bunch of as one.

While I was making this particular taggie blanket for little Evelyn, I thought that I would take some pictures and show you how you can create your own unique, handmade baby gift.

You want to begin by purchasing half a yard of soft and cuddly fabric. I usually use a fleece, flannel, Minky, or a combo of two. (If you are not familiar with Minky, it is the softest, most touchable fabric out there. When I have Minky in the house, I love to sit and stroke it. It seriously is that soft. It is a little pricey, but the great thing about this project is that it requires very little fabric.) Cut two 18 inch squares of the fabric.


You will also need a variety of ribbon. You can use as much variety as you would like. I like variety and usually have ribbon on hand, so I use lots of different colors, patterns, and sizes. I cut 3-4 inch lengths of the ribbon.
Now you fold your ribbon over and pin it in place. I used to measure when I placed the ribbon around the blanket. Now I just estimate and place it where it looks good. This time I happened to have extra ribbon pieces at the end so I just doubled up on the ribbon in some places.

Once all of your ribbons have been pinned in place, you will want to stitch around the entire blanket to secure the ribbons.


Now you will pin your two fabrics right sides together and sew around the entire blanket again. Make sure that you cannot see your first stitching line. (I used the serger to do this step.) You will also want to make sure to leave a few inches open so that you can turn your blanket right-side out.

Turn your blanket right-side out and tuck the seems of your opening to the inside. Now you will top stitch the opening shut. And you are done!

Wednesday, January 28, 2009

C-Y-O: Glass Etched Window


As promised, here is a post on our glass etched window. This project idea began when my friend and I were driving around town on large garbage week looking for treasures. The two treasures I cam away with were old windows. M wasn't so sure when I brought them home and then again when we had to move them, but I knew they were beauties in the making.

The white eight paned window is still waiting for its beauty treatments, but the brown three section window has found its home in our bedroom. (At least for now. We may end up hanging it on the wall or moving it to a different room entirely, but for now it is cozily adorning the wall next to a dresser.)
I have always wanted to try glass etching and decided that was just what this window was in need of.
I started by cutting clear contact paper to the size of each glass section and applying it. I then traced on the images that I wanted to etch. After all
three sections had been traced, I cut out the parts that I wanted etched with a razor blade. Here is a picture of M making sure that the edges were firmly adhered.We then applied the etching cream. (I got mine at Michael's.) We applied it with foam brushes. After trying a sample on some glass I stole from an old picture frame, I knew to apply it nice a thick so that you don't see the brush strokes. We worked together so that we could get the cream on in a timely manor. After letting the cream sit for around 5 minutes, we put the entire window into the bathtub and rinsed off all of the etching cream with the shower head.
Once the cream had been rinsed thoroughly, we peeled off the contact paper and were left with the etched image on the glass. The etching isn't super dark. If you look at it from the right angle it is easily seen, but from the front it is faint. M is trying to come up with ways to back light it to help the image show up a bit more. But for now, I am satisfied.

Wednesday, January 21, 2009

A Birthday Gift Idea

This weekend I was invited to a birthday party for one of my preschoolers. M and I made a brief appearance at the bowling alley, dropped off our gift, and continued on our merry way. While trying to come up with a creative and inexpensive gift, I read this post from Laurel over at "Ducks in a Row." I thought that this was a particularly appropriate gift from a preschool teacher.
I found the bag at Joann Fabrics. The clerk who checked me out likes me and gave me a 50 percent coupon even though I forgot mine at home. (She also gave me $10 off another time. I will have to try to get her every time I am in there.) I had the fabric for the L at home and used some Heat and Bond to attach it and then zig zagged around it.

Here are my final results:


I am thinking that this will be a repeat performance gift.