Here is the eye spy bag tutorial that I promised from Peachy's birthday party. Once again, I have to apologize for my lack of photographs to accompany this tutorial. It is hard for me to stop and take a break once I start a project even though it would probably save me time in the long run if I didn't have to draw up pictures. Oh well.
Supplies:
-fabric (I used a cotton flannel, but pretty much any fabric should work.)
-clear craft vinyl (This can be purchased by the yard from fabric stores.)
-tissue paper
-rice
-small items to place inside the bags (buttons, small toys, paper clips, paper pieces, et cetera)
Cutting Instructions:
For each bag cut
-one 5.5 x 5.5 inch square from fabric
-four 4.5 x 1.5 inch rectangles from fabric
-one 3.5 x 3.5 inch square from vinyl
Sewing Instructions: (All seams will be 1/4 inch, unless otherwise noted.)
1. Place one fabric rectangle vertically, right side up. Place another fabric rectangle on top of the first horizontally, right side down. Your fabric will look like this:
2. Stitch the rectangles together along the right side as indicated in diagram A.
3. Open along the seam so both pieces are right side up.
4. Place a third rectangle on top of the bottom rectangle, right side down. Your fabric will look like this:
5. Stitch the rectangles together along the top as indicated in diagram B.
6. Open along the seam so all three pieces are right side up.
7. Place the last rectangle on top of the right rectangle with right sides together. Your fabric will look like this:
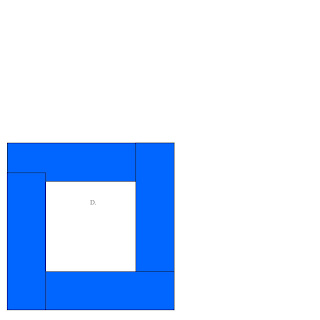
8. Open along the seam. Match up the last rectangle's bottom left side with the first rectangle's top side, and stitch with right sides together. Open along seam. Your make a window and look like firgure D.
9. Place the vinyl square on the wrong side of the rectangle pieces. Place a piece of tissue paper over the vinyl to prevent your presser foot from sticking. With the fabric side up, zig-zag around the window opening securing the vinyl to the fabric.
8. Gently tear the tissue paper from the vinyl.
9. Place the window piece on top of the remaining 5.5 inch square, right sides together. Zigzag around the edges making sure to leave an opening for turning.
10. Using the opening, turn the bag right sides out.
11. Place the small items into the bag using the opening.
12. Fill the bag with approximately 3/4 c of rice.
13. To finish the bags, whip stitch the opening shut with a needle and thread.


Great tutorial! I've been thinking about making one of these for my son. Now I just have to find some vinyl.
ReplyDeleteThanks! Stopping in from Tip Me Tuesdays.